
Why should I mark-up a PDF?
Using comments and annotations to digitally mark-up a PDF help to reduce miscommunication, typos, errors between you and your graphic designer. It increases clarity, and helps to speed up the revision process. It’s a win-win for both you and your designer!
When you mark-up a PDF, the designer gets an automatically generated checklist of your requested changes to help them keep track of what they need to do and what tasks they’ve completed as they go along. When paired with clear communication, a designer can easily understand what needs to be done, changes to be made or content deleted, and areas to approach differently – all in one place!
It is fast, efficient, and clear.
How do I add annotations and comments to a PDF?
Setting-up Your Workspace
Most computers have an PDF reader on them. Acrobat Reader is the most widely used one out there. You may already have it on your system without even knowing it! If you don’t see Adobe Reader in your Applications folder, you can download it for free online:
Older versions of Adobe Acrobat Reader:
- Open the PDF in Adobe Reader
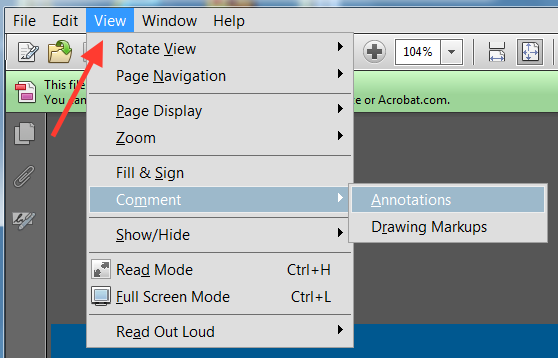
- In the upper toolbar, click View.
- From the drop down menu, select Comment > Annotations
- A selection of Annotation tools will appear to the right of your screen.
Adobe Acrobat Reader DC:
- Open the PDF in Adobe DC
- In the upper toolbar on the far left, click “Tools”
- Scroll down to “Review & Approve”
- Click “Comments”
- A selection of annotation tools will appear in the upper section of your screen.

Getting Started with PDF Mark-up
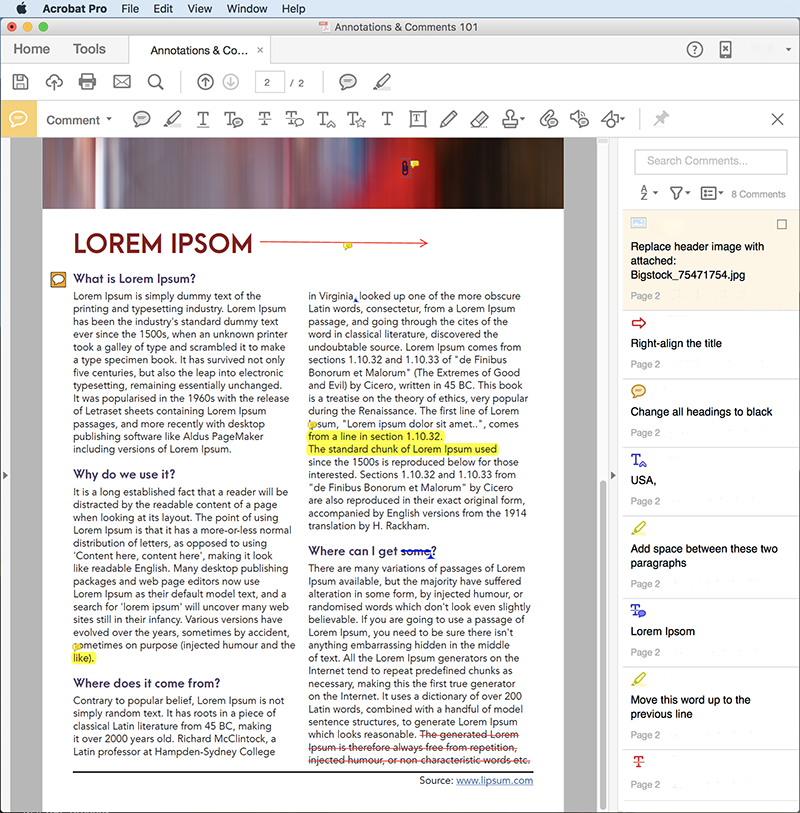
There are many ways to approach the feedback process with PDF mark-up. To help get you started, here are some tips on when and how to use the annotation and comment tools in Reader:
General Feedback
![]() Comment bubbles are for providing feedback and instruction to the designer.
Comment bubbles are for providing feedback and instruction to the designer.
If multiple people are commenting on a document, please delete any unnecessary comments (such as internal conversations or unanswered questions) and leave only what is relevant to the designer. This will prevent any confusion and help the revision process go more efficiently.

Use shapes to draw attention to certain areas of a document. This is a rarely used tool in my experience – but its good to know its there for the odd occasion you need it.
Text Changes
![]() The red strike through is used for deleting text.
The red strike through is used for deleting text.
![]() The blue strike through is for replacing text.
The blue strike through is for replacing text.
![]() The insert text tool for adding new text.
The insert text tool for adding new text.
![]() The highlighter tool draws attention to a certain area of text.
The highlighter tool draws attention to a certain area of text.
If providing new text, avoid the temptation to write “Please replace with…” or to make conversation with the designer within your annotations. Instead, just add the new text. That way the designer can just Select All and paste in the document. This saves you both time!
Changes to Visual Elements
![]() You can add files, such as images, with the paper-clip icon.
You can add files, such as images, with the paper-clip icon.
When sending an image to be used in the design, graphic designers usually prefer images be sent separately so that we can import them directly into our working project folder.
Additional Notes:
Repeated Consistent Changes:
If you are giving direction that applies to the whole document, you only need to say it once, not each time you come across it in the document. Examples of this would be “Align all text to the left in this document” or “Remove all full-page images/blank pages in this document” (note the word all here). This will save you from typing it out numerous times and cluttering up the PDF with redundant text.
Need More Information on Marking-up PDFs?
If you need more guidance, there are lots of video tutorials, written instruction, and posts on PDF mark-up online. Just google your query, or check out these links: Reader XI (older version that these instructions were initially written for) and Reader DC (newest release of Reader).
PDF Mark-up Pet Peeves
Padding Statements
If you want your graphic designer to do something, just tell them to do it! Do not pad it with wishy washy language like “Maybe you could try…” or “What do you think if…” or “… but you’re the designer.” unless you actually do want to know what your designer’s professional thoughts on the subject before they complete the task.
PDF annotation is not the place for discussion. It is for direction. If you actually do want to discuss a design idea with your designer, do it over email or phone or someplace else.
Respect your designer’s time and save yourself the extra typing. Just type what is needed in clear, concise language. Nothing more in the PDF.
Identifying the Rejects
Do not mark the rejects during concept development. Instead, only mark the pages you like/have changes to/want elements from. Marking a concept “Don’t like this.” or “Not this one” is redundant. You’re giving yourself extra work, cluttering up the document’s annotation checklist, and taking the focus away from what needs to be done in the document.
However, if there is something about a rejected concept you want the designer to know about, that is different. For example, “We don’t like this concept because its too dark. Please try this layout with brighter colours” is providing valuable feedback and direction. You are identifying why you don’t like the concept and directing the designer to approach it in another specific way.
Writing a Novel in Comment Bubbles
I have had over a page of text in a single comment bubble… which I was able to summarize down to fit on a single post-it note on my desk. Again, save yourself time and the designer’s time by being clear and concise in your instruction. Save your novel writing for after-hours.
