
These instructions are written for InDesign users and people working with graphic designers, but could be applied to other applications and fields as well.
Although images cannot carry actual alternative (ALT) text around with them, you can add the ALT text to the metadata of an image to use as you please. This aids in efficiency and reduces chance of error when applying ALT text to images.
This post covers two methods for collaborating with your client/communications on applying image metadata:
- Adding ALT text to image metadata on their PC (no special software required – free!)
- Adding ALT text to image metadata using Adobe Bridge (subscription required)
Alternatively, the designer can do the above if the client is unable to.
Followed by three different methods for graphic designers listed below:
- Applying the image metadata as ALT text manually in InDesign via Object Export Options
- Applying the image metadata as ALT text in InDesign using a Script (my personal favourite)
- Applying the image metadata as ALT text in InDesign using Object Styles
Client:
Adding ALT text to the metadata (PC/Windows):
- Select your images and write out your alternative (ALT) text.
- It is best practice to do this in Word (or another application that can detect typos) as ALT input and metadata input boxes do not flag spelling/grammar errors.
- A good resource on writing ALT text is Image Concepts by W3C. They are the organization that develops the Web Content Accessibility Guidelines (WCAG) referred to in the Information and Communications Standard of the AODA.
- Open the folder where your images are kept (ex: Pictures folder in Windows)
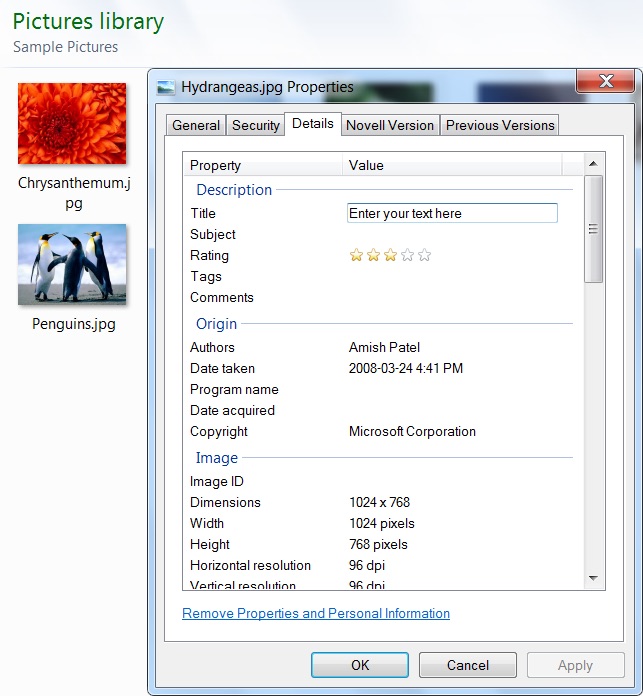
- Right click the image
- Select “Properties” from the drop-down menu.
- Click the “Details” tab.
- Paste your ALT text into the “Title” input field of the photo
- Click OK (this will save the metadata)
- Send the photos with the metadata to your Designer/Design Request. Inform your designer that you have put the ALT text in the Title/Description field of the photo’s metadata.
Note: Instructions above written for Windows 7 users.
Faster Alternative: Adobe Bridge
If your client has an Adobe Creative Suite license, they can do these steps faster in Adobe Bridge, where they would put the ALT text in the Description OR Headline field of the image metadata.

Designer:
Below are instructions on 3 different methods to apply image metadata to your images as ALT Text within InDesign: using a script, doing in manually, or using Object Styles. Choose the one that works best for you:
Applying ALT text with a script
- Confirm you are using the photos with the metadata (can double check by opening in Adobe Bridge – text will likely be in the Description field)
- Run the ApplyALTfromXMP script
- Confirm the ALT Text Source is “XMP: Description” (or wherever else the ALT text is saved)
- Click OK
- If successful, you will get a dialogue box with total number of images processed displayed. Click OK.
- If you do not get the quantity you were expecting, confirm the location of the ALT text in the metadata.
- If you do not get a dialogue box, something is wrong with the script and you’ll need to troubleshoot.
ALT Text Script:
If you do not have the ALT text script installed, you will need to install it yourself. Instructions and free download are at Batch Apply XMP ALT Tags to EPUB and HTML Images

Applying ALT text manually
- Confirm you are using the photos with the metadata (can double check by opening in Bridge – text will likely be in the Description field)
- In Design, select the photo
- Go to Object in your top navigation bar
- Select Object Export Options from the dropdown menu
- Confirm you are in the ALT text input area
- Click “Text Source”
- Select “Description” from the dropdown menu
- Click “Done”
Note:
Skip Step 3 and 4 by using the Option Export Options key command Opt+X (if not default on your system, you can set up a custom key command to speed things up)

Using Object Styles for ALT Text
If you are using Object Styles in your document (great for long docs!), you can also automate the ALT text there.
- Create an Object Style.
- In the Object Style’s export options, you will see ALT Text, Tagged PDF, and ePub. Select desired option.
- From the dropdown menu, select “From XMP: Headline” (or wherever you’ve stored your ALT text)
- Click OK to apply the changes.
Now, if you check the Object Export Options of your image that style is applied to, the ALT text should be there!
