

When working with a lot of PDFs as part of your day-to-day work, scripts to automate regular tasks can come in really handy.
The instructions below will automate some of the tasks that are often part of the workflow when creating accessible PDF documents. The tasks I am focusing on for this Script are found under *Properties* in PDF documents in *Adobe Acrobat Pro* (not Acrobat Reader). They include:
- Add Tags to Document
- Show Document Title
- Show Bookmarks
- Set the document Language
- Run Full Accessibility Check
These instructions presume that the document is tagged and that you/your client is filling out Document Title and keywords in the original document’s File Info. If this is not the case, you’ll need to add those manually. To find out how to do this, I recommend the Accessible Digital Office Document Project (ADOD).

Acrobat XI:
- View > Tools > Action Wizard
- The Action Wizard panel will appear on the right hand side of your document. Select “Create New Action” from the menu. A window will appear, showing you the available options for creating an Action Script.
- To automate Add Tags to Document:
- Accessibility > Add Tags to Document.
- Click “Add to right hand pane,” the green plus (+) icon.
- Set the document’s Description, such as the document Title (if in the document Properties in Word or InDesign) and Author:
- Content > Add Document Description
- Click “Add to right hand pane,” the green plus (+) icon.
- Click “Specify Settings”. A box will appear with fields and check boxes.
- Uncheck “Prompt Use.”
- Note: Most existing Action Scripts have this checked, which is helpful in scenarios like training. However, prompting can be annoying when you already know what your doing. By unchecking “Prompt User” you are letting the Action Script run through its tasks without you giving it further permission.
- Leave the check boxes clicked for the info you want carried over from the original document. If you want something different, for example the author being Company X rather than whoever wrote the original document, you can put Company X in the Author field.
- Set the Initial View, such as Navigation Tab (Show Bookmarks) and Show: Document Title (not File Name)
- Document Processing > Set Open Options
- Click “Add to right hand pane,” the green plus (+) icon.
- Uncheck “Prompt User”
- Click “Specify Settings.” Under Initial View, select Bookmarks & Page, and under Window Options, you’ll see Display Document Title. Select “Yes” instead of “Leave As Is”
- Set Reading Language:
- Accessibility > Set Reading Language.
- Click “Add to right hand pane,” the green plus (+) icon.
- Uncheck “Prompt User”
- Click “Specify Settings.”
- Select English from the language options. (if you often work with documents written in other languages, you can set up different Action Scripts for French, Spanish etc).
- To automate running the Full Accessibility Check:
- Accessibility > Full Accessibility Check
- Click “Add to right hand pane,” the green plus (+) icon.
- Uncheck “Prompt User”
- Accessibility > Full Accessibility Check
- Once you have finished applying the necessary tasks to your Action Script, select “Save”
- Enter the desired name and description for your Action Script.
- And ta-da! You’re done!
Resources:
Acrobat DC
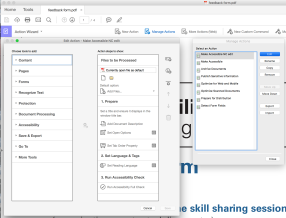
Acrobat DC comes with an Action Script called ‘Make Accessible’. However, you may not want it to do all the tasks it comes with (OCR, autotag etc) or prompt you at every step (inefficient use of time). You can either make your own Action Script, or create a revised version to suit your needs.
- Open Tools and scroll down to Customize.
- Select Action Wizard (Note: to add it to your sidebar in Acrobat for quick access in future, click ‘Add’)
- Select “Manage Actions” in the top navigation bar
- You will see a list of Actions. Select “Make Accessible” (default script) and select Copy.
- Enter a new or revised name
- With your copied script selected, click Edit.
- Select the actions you with to edit/delete and change as you best see fit.
Resources:
Action Wizard (Acrobat Pro DC)
Create and verify PDF accessibility (Acrobat Pro DC)
